Update: KineticJS upgraded from 4.1.2 to 5.0.1. Now Kinetic.Polygon is Kinetic.Line with closed:true, points must be flat arrays of coordinates, and the API for making things draggable is a bit improved.
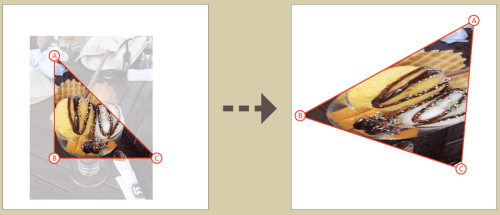
HTML5 Canvas is a drawing interface that provides primitives for shapes, paths, transformations, and — most important for today — direct access to pixel data in the browser. Lately, I have wanted to display warped versions of dynamic browser graphics, and this is a perfect fit. In this article, I explore deforming a single triangle, essentially via barycentrically interpolated “texture mapping” from one HTML5 Canvas to another.
If you want to immediately see the UI in action, go look at it right here. I cannot use Javascript or iframes directly due to wordpress.com limitations, but it looks like this:
This article has four parts: The input controls, the output controls, the pixel pushing, and the math. The input and output are basic combinations of KineticJS and KnockoutJS, the pixel pushing is done via low-level HTML5 Canvas methods, and the math appendix describes barycentric coordinates and texture mapping very briefly. I also make free use of jQuery and Underscore aka “$” and “_“.
(Note that for security reasons all the Javascript and images involved must be hosted from the same origin, so to try this at home (at least in Chrome) you may need to run a little HTTP server. A very simple one ships with Python, so run “python -m SimpleHTTPServer” in any directory and then navigate to localhost:8000)
Input: A triangular viewport
I envision for a static triangular viewport with a movable image, like so:
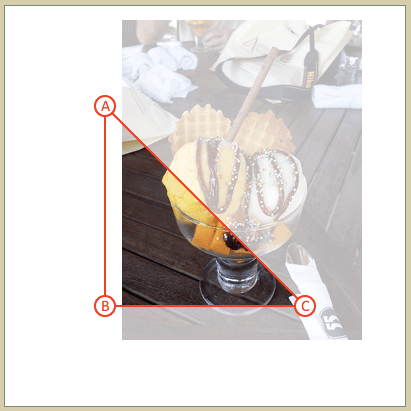
Those parts of the image in the viewport will be the “output” of this control. The read-only interface to this control will thus include some image data – which is necessarily rectangular – and a triangle within that image data that is selected for output. The image data will be a KnockoutJS observable that updates whenever the input image moves.
/*
You might summarize the interface like so...
{
   viewport_triangle: [A, B, C]
   image_data: ko.Observable(ImageData)
}
*/
And the parameters will be an image URL (must be same-origin), a DOM element ID to attach to, the size that the canvas should be, and the triangle defining the viewport.
The implementation is a Kinetic.Layer with a single draggable Kinetic.Image.
There is some HTML Canvas usage to note. The `getContext` method need only be called once at the outset; it only currently accepts the parameters "2d" or "GL" and there can only be one context per canvas. Once a context is in hand, the getImageData method returns an ImageData wrapper object that contains width, height, and a one dimensional array of pixel data — it is your job to do the computation of pixel widths and row widths to access the data in this array.
function draggable_image_layer(image_url) {
    var image_layer = new Kinetic.Layer();

    // Since Knockout's reactivity is push-based, one
    // should be careful in production to check performance
    // and selectively throttle "continuous" event sources
    // like a moving image. I won't bother now, though.
    image_layer.image_data = ko.observable();
    function update_image_data() {
        var canvas = image_layer.getCanvas(); // Kinetic.Canvas, not DOM <canvas>
        image_layer.image_data(
          canvas.getContext('2d')
                .getImageData(0, 0, canvas.getWidth(), canvas.getHeight()));
    }

    var image = new Kinetic.Image({ draggable: true });
    image_layer.add(image);
    image.on("dragmove", update_image_data);

    var img = new Image(); // HTML <img> "tag" to load
    img.onload = function() {
        image.setImage(img);
        image_layer.draw();
        update_image_data();
    };
    img.src = image_url;

    return image_layer;
}
With that, we can quickly put together a Kinetic.Stage that makes the viewport obvious by outlining it, labeling the corners, and dimming everything outside.
function triangular_viewport_control(named_parameters) {
    var self = {};

    // Required parameters passed in a dictionary for legibility of the client
    var container_id = named_parameters.container_id;
    var container_size = named_parameters.container_size;
    var image_url = named_parameters.image_url;

    // I didn't mention it but the first point had *better* be
    // the top left and the last one bottom right 🙂
    var viewport_triangle = named_parameters.viewport_triangle;

    // Attach to the DOM and add the layers
    var stage = new Kinetic.Stage({
        container: container_id,
        width: container_size.width,
        height: container_size.height
    });
    var image_layer = draggable_image_layer(image_url);
    var label_layer = new Kinetic.Layer();
    stage.add(image_layer);
    stage.add(label_layer);

    // Dimming the area outside the viewport
    label_layer.add(new Kinetic.Line({
        closed: true,
        points: flattend_point_coords([
            { x: 0, y: 0 },
            { x: 0, y: container_size.height },
            { x: container_size.width, y: container_size.height },
            { x: container_size.width, y: 0 },
            { x: 0, y: 0},
            viewport_triangle[0],
            viewport_triangle[2],
            viewport_triangle[1],
            viewport_triangle[0]
        ],
        fill: 'white', strokeWidth: 0, opacity: 0.7,
        hitFunc: function() { }
    }));

    // Solid red outline
    label_layer.add(new Kinetic.Line({
        closed: true,
        points: flattened_point_coords(viewport_triangle),
        strokeWidth: 2, stroke: 'red',
        hitFunc: function() { }
    }));

    // Labeled corners
    _(viewport_triangle).each(function(point, idx) {
        var letter = String.fromCharCode('A'.charCodeAt(0) + idx);
        label_layer.add(circled_letter(letter, point, false));
    });

    label_layer.draw(); // Kick it for good measure
    return {
        viewport_triangle: viewport_triangle,
        image_data: image_layer.image_data
    }
}
In the above code, as well as the following circled_letter snippet, you may notice some weird “hitFunc: function() { }” bits. This is to make sure that the passive elements of the UI do not stop mouse events from reaching things underneath them, by “drawing” an empty shape for hit detection. There may be a more appropriate way of doing this, but setting draggable: false is not enough.
The method to create a circled letter is to use a Kinetic.Group with its position set to the center of the circle, and then to position the Kinetic.Circle and Kinetic.Text relative to the group.
function circled_letter(letter, position, draggable) {
    var options = draggable ? {} : { hitFunc: function() { } });

    var group = new Kinetic.Group(_({
        x: position.x, y: position.y,
        draggable: draggable
    }).extend(options));

    var circle = new Kinetic.Circle(_({
        x: 0, y: 0,
        radius: 10,
        fill: 'white', stroke: 'red',
        strokeWidth: 2,
        draggable: false
    }).extend(options));
    group.add(circle);

    group.add(new Kinetic.Text(_({
        x: -4, y: -6,
        text: letter, textFill: 'red',
        opacity: 1.0,
        draggable: false,
    }).extend(options)));

    function getPosition() {
        return {x: group.getX() + circle.getX(), y: group.getY() + circle.getY()};
    }

    // Expose the position as an observable. Yes, there is namespace
    // collision danger, but I need to return the group, not a wrapper,
    // so it can interface with the Kinetic.Layer
    group.position = ko.observable(getPosition());
    group.on('dragmove', function() { group.position(getPosition()) });

    return group;
}
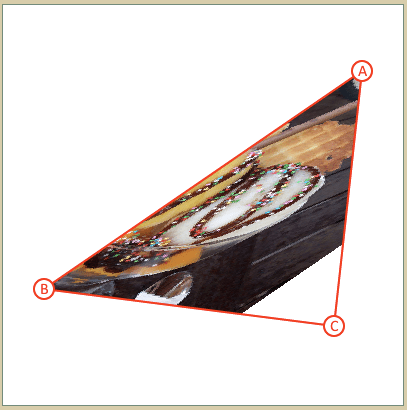
Output: An interactively-warpable triangle
I want the output to have a triangle labeled in accordance with the input, but for the labeled corners of the triangle to be draggable, and for the distorted image to show up within that triangle.
This involves essentially the same tools as the input: A Kinetic.Layer for the image data and another for the now-draggable labels. Then I use Knockout’s automatic dependency management to add a subscription to the warped triangle as well as the input image data, re-projecting the image on every update.
The one new HTML Canvas method here is putImageData which is pretty self-explanatory.
function warpable_triangle_control(named_parameters) {
    var self = {};

    var container_id = named_parameters.container_id;
    var container_size = named_parameters.container_size;
    var input_image_data = named_parameters.input_image_data;
    var input_triangle = _(named_parameters.input_triangle).map(p2v); // to vectors

    var stage = new Kinetic.Stage({
      container: container_id,
      width: container_size.width,
      height: container_size.height
    });
    var control_layer = new Kinetic.Layer();
    var drawing_layer = new Kinetic.Layer();
    stage.add(drawing_layer);
    stage.add(control_layer);

    var corners = _(input_triangle).map(function(xy, idx) {
        var letter = String.fromCharCode('A'.charCodeAt(0) + idx);
        var corner = circled_letter(letter, v2p(xy), true);
        return corner;
    });

    // http://knockoutjs.com/documentation/computedObservables.html
    self.warped_triangle = ko.computed(function() {
        return _(corners).map(function(corner) {
            return corner.position();
        });
    });


    self.warped_points = ko.computed(function() {
        return flattened_point_coords(self.warped_triangle());
    });

    // KineticJS is not really designed with functional reactivity in
    // mind, so I create one polygon and mutate its points according
    // to the changing triangle.
    var outline = new Kinetic.Line({
        closed: true,
        points: self.warped_points(),
        strokeWidth: 2, stroke: 'red',
        drawHitFunc: function() { }
    })
    ko.computed(function() { outline.setPoints(self.warped_points()) });
    control_layer.add(outline);
    // Javascript fails at eta-contraction
    _(corners).each(function(corner) { control_layer.add(corner); });
    control_layer.draw(); // Kick

    // The drawing context is always the same
    var drawing_context = drawing_layer.getCanvas().getContext('2d');

    // Subscribe to all relevant changes automatically via ko.computed,
    // and re-map the triangle. Again, throttling might be necessary in
    // a production system. The interesting work is done in map_triangle,
    // shown later.
    ko.computed(function() {
        var warped_triangle = _(self.warped_triangle()).map(p2v); // Get in vector form
        var current_image_data = input_image_data(); // Freeze the observable here
        if (!current_image_data) {
            console.log('Bailing out; image not loaded yet?');
            return;
        }
        var warped_image_data = drawing_context
                                  .getImageData(0, 0,
                                                drawing_context.canvas.width,
                                                drawing_context.canvas.height);

        //
        // *** The Business ***
        //
        map_triangle(current_image_data, input_triangle,
                     warped_image_data, warped_triangle);
        //
        // *********************

        drawing_context.putImageData(warped_image_data, 0, 0);
    });

    return self;
}
HTML Canvas Pixel Pushing
The pixel transformation works by considering each pixel in the output canvas and copying the appropriate pixel from the input. The inverse projection is computed by converting each point to barycentric coordinates relative to the warped triangle, then back to cartesian coordinates relative to the original triangle.
Exercises for the reader: (1) Add anti-aliasing. (2) Rewrite as a scanline algorithm over the input triangle.
var PIXEL_WIDTH = 4;

function map_triangle(src_image_data, src_triangle, dst_image_data, dst_triangle) {
    var src_pixel_data = src_image_data.data;
    var dst_pixel_data = dst_image_data.data;

    for(var x = 0; x < dst_image_data.width; x++) {
        for(var y = 0; y < dst_image_data.height; y++) {
            // This line is the exciting part
            var uv = cartesian_to_barycentric(dst_triangle, [x, y]);

            // Another lovely aspect of barycentric coords
            var xy_in_triangle = (uv[0] >= 0) && (uv[1] >= 0) && (uv[0] + uv[1] <= 1);

            var dst_pixel_start = PIXEL_WIDTH * (x + y * dst_image_data.width);

            if (xy_in_triangle) {
                src_xy = barycentric_to_cartesian(src_triangle, uv);
                src_pixel_start = PIXEL_WIDTH * (Math.floor(src_xy[0])
                                  + Math.floor(src_xy[1]) * src_image_data.width);

                dst_pixel_data[dst_pixel_start]   = src_pixel_data[src_pixel_start];
                dst_pixel_data[dst_pixel_start+1] = src_pixel_data[src_pixel_start+1];
                dst_pixel_data[dst_pixel_start+2] = src_pixel_data[src_pixel_start+2];
                dst_pixel_data[dst_pixel_start+3] = src_pixel_data[src_pixel_start+3];
            } else {
                dst_pixel_data[dst_pixel_start] = 255;
                dst_pixel_data[dst_pixel_start+1] = 255;
                dst_pixel_data[dst_pixel_start+2] = 255;
                dst_pixel_data[dst_pixel_start+3] = 255;
            }
        }
    }
}
And to plug it all together, here is the “main” glue.
$(document).ready(function() {
    var input_control = triangular_viewport_control({
        container_id: 'input-container',
        container_size: { width: 400, height: 400 },
        image_url: 'ice_cream.jpg',
        viewport_triangle: [
            { x: 100, y: 100 },
            { x: 100, y: 300 },
            { x: 300, y: 300 }
        ],
    });

    var warped_output = warpable_triangle_control({
        container_id: 'output-container',
        container_size: { width: 400, height: 400 },
        input_triangle: input_control.viewport_triangle,
        input_image_data: input_control.image_data,
    });
});
Appendix A: Barycentric coordinates
The word barycenter means “center of mass”. For our purposes, we can skip the huge world of awesome facts related to “barycentrism”, but I’ve linked to a bunch of great reads below. The useful bit for us is the great coordinate system the idea gives us: We can express any point inside a triangle as a linear combination of the three corners. Check out this explanation with interactive visualization for a more detailed explanation. The useful bit is that these coordinates are relative to the triangle corners, not the origin of the plane, so we can use the same coordinates within a new triangle to get a linear map from one triangle to the other that obeys somewhat our intuition about where points in the triangle should end up.
// Vector math
function add(v0, v1) { return [v0[0] + v1[0], v0[1] + v1[1]]; }
function sub(v0, v1) { return [v0[0] - v1[0], v0[1] - v1[1]]; }
function dot(v0, v1) { return v0[0]*v1[0] + v0[1]*v1[1]; }
function mul(k, v) { return [k*v[0], k*v[1]]; }
function p2v(p) { return [p.x, p.y]; }
function v2p(v) { return {x: v[0], y: v[1]}; }

function cartesian_to_barycentric(triangle, xy) {
    var a = triangle[0];
    var b = triangle[1];
    var c = triangle[2];

    var v0 = sub(c, a);
    var v1 = sub(b, a);
    var v2 = sub(xy, a);

    // Compute dot products
    var dot00 = dot(v0, v0)
    var dot01 = dot(v0, v1)
    var dot02 = dot(v0, v2)
    var dot11 = dot(v1, v1)
    var dot12 = dot(v1, v2)

    // Compute barycentric coordinates
    var invDenom = 1 / (dot00 * dot11 - dot01 * dot01)
    var u = (dot11 * dot02 - dot01 * dot12) * invDenom
    var v = (dot00 * dot12 - dot01 * dot02) * invDenom

    return [u, v];
}

function barycentric_to_cartesian(triangle, uv) {
    var a = triangle[0];
    var ba = sub(triangle[1], a);
    var ca = sub(triangle[2], a);

    return add(a, add( mul(uv[0], ca), mul(uv[1], ba)));
}


var flattened_point_coords(points) {
    return _.chain(points)
        .map(function(p) { return [p.x, p.y]; })
        .flatten()
        .value();
}
Further reading
HTML Canvas:
- HTML5 Canvas Tutorials by Eric Rowell (also creator of KineticJS)
- HTML5 Canvas Tutorial at Mozilla Dev Network
- HTML5 Canvas Cheet Sheat
KineticJS:
KnockoutJS:
- KnockoutJS
- KnockMeOut, a great blog dedicated to KnockoutJS
Image warping and texture mapping:
- Texture Mapping by Miroslav Olearnik of Comenius University.
- Image Deformation Using Moving Least Squares by Scott Schaefer (Texas A&M University), Travis McPhail (Rice University), and Joe Warren (Rice University)
- Image Warping with Scattered Data Interpolation Methods by by Detlef Ruprecht , Heinrich Müller of Universität Dortmund
Barycentric coordinates:
- Barycentric Coordinates by Adrian Boeing
- Barycentric Coordinates at Cut The Knot
- Mathematics for Computer Graphics –
Barycentric Coordinates by Dr. Philippe B. Laval of
Kennesaw State University

Hello, this is a great article. As far as I’ve searched the internet it’s the closest to what I was looking for 🙂
But in my case I’m interested only in the output. Instead of a triangle, it would be a rectangulum and the full image would be printed. But I would like to drag corners and have the same effect of yours output.
I’ve been trying hard for a couple of days to apply the same concepts of your example into mine, but without success yet. Some information I found required the use of webGL and the 3d canvas for this kind of transformations, but your example looks pretty much cleaner to me. Can you give me some light or point me some direction on how to do this?
Thank you very much
Hi Tiago,
Your use is exactly what this is for. To use this technique with a rectangle, you will split the rectangle into two triangles by cutting it along the diagonal, then the click & drag on the shared corners can change both triangles together.
However, for higher performance, you will probably want to use WebGL and 3D canvas. This splitting into triangles and then mapping source triangles to target triangles is just what GL polygon drawing and texture mapping do anyhow. I simply wanted to experiment without them and have extreme control over the details.
I would love it if you write about your solution.
– Kenn
Thank you Kenn,
I’ve done as you said, spliting the image in 2 triangles. Using this technique worked perfectly!
I’ve just a question: In my case, I’ve a more than one image in the same stage/layer. I made this work with each image individually, but the `context.putImage()` method doesn’t interact with kineticJS.
I mean, once I do a `draw()` in kinetic, everything is lost.
Is there a way to take this image data and set it as Kinetic.Image image? Instead of just drawing it in the canvas?
Hi Tiago,
(It seems the nesting limit for comment threads is 3? So I am replying here)
I do not totally understand what you are encountering with KineticJS’s draw() method, but it sounds like you might need more layers, so that drawing for one does not interfere with drawing for the others. I do not think that you can use Kinetic.Image easily, because you do not have direct access to the pixels as far as I can tell… Yet there are some drawing primitives so there might be a way.
If you can post a jsfiddle it may help.
– Kenn
Hi !
I’m trying to do the same. I added a viewport_triangle_2 to make a rectangle and I try to fix it cause nothing works now. Does anybody manage to do something like that ?
I’m really bad at Math, and hope to do not have to hack Barycentric functions.
The question that still remains is : if I manage to do a square with two triangles, I’m affraid to transforme only one half of the image… That is not really a question.
However, thanks a lot for this great article… OpenGL have not conquered all browser yet.
Very useful article, Thumbs up.
If you could fix the edge pixeleted issue somehow that would be awesome.
Thanks
the example doesn’t work anymore, I get this error
Uncaught TypeError: Failed to execute ‘fill’ on ‘CanvasRenderingContext2D’: parameter 1 (‘[object CanvasRenderingContext2D]’) is not a valid enum value.
Any idea?
Thanks for pointing this out. I’ll look into why and fix it up. First thing will be to upgrade to the latest KineticJS.
OK, updated to work with KineticJS 5.0.1
Hey Kenn, thanks, works like a charm now. 2 thumbs up
Useful article!
Can you give me some suggestion to make it work with more “vertexes” (so, not only with a triangle but, for example, with a square or a general polygon)?
Thanks
I tried to get things done here some moths ago thx to this tutorial, but i kill too much houres without any result, transforming this script to get a square distortion, but I guess I’m too bad at math…
If you find how to perfom that, please think about me 😉